Источник:
http://www.dynamicsaxtraining.com/dy...ine-management
==============
Hi! In this training lesson, we will study the Quarantine Management functionality in Microsoft Dynamics AX.
Introduction
The quarantine management is used to manage items that must be quality controlled (quarantine items). For example, the Fans Company purchases fans and sells them. Customers often return a lot of fans because they don’t work. The Fans Company decides to check the purchased fans. As a result, the company creates a special place in the warehouse. All fans which arrive to the warehouse are transported to this place for quality control. The Quality Manager will randomly pick fans from each case and will check how they work. If a selected fan works, whole case is marked as checked. Then, the checked cases will be transported to the destination location.
Microsoft Dynamics AX uses a quarantine order to control quarantine items. Let’s check how this works in the application.
Create and Set Up an Item
We will work with
this demo data. Let’s create the Fan item. We have already studied how to create an item in
this training lesson, so you need to create an item with the following values:
- Item number = 101
- Item name = Fan
- Item group = Packaging
- Inventory model group = FRP_QUAR
- Dimension group = N-WLP
There are two groups attached to an item which affect whether an item can be used in quarantine management:
- Inventory model group. An inventory model group can be accessed from Inventory Management > Setup > Inventory > Inventory model groups. The Quarantine management check box on the Setup tab must be selected. We have set up the FRP_QUAR inventory model group for the Fan item, this group has the following setup:
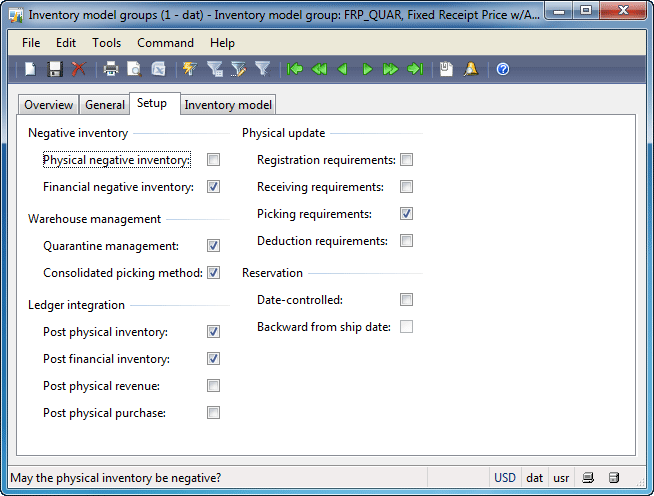 Inventory model groups form
- Dimension group. This group determines what parameters are required to store an item. The minimum setup is Site and Warehouse. The Dimension groups form can be accessed from Inventory Management > Setup > Dimensions > Dimensions groups. We have set up the N-WLP dimension group for the Fan item, this group has the following setup:
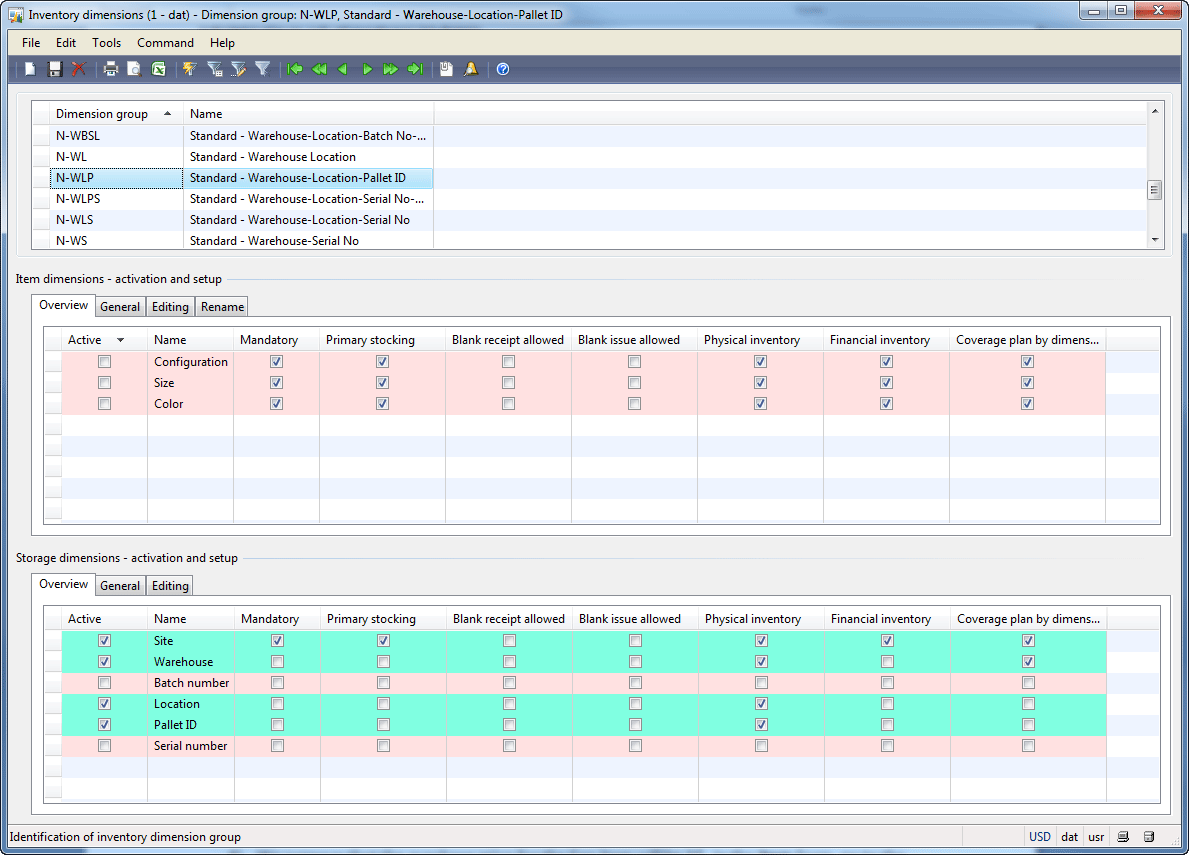 Inventory dimensions form
Let’s set up additional parameters for the Fan item. We suppose that:
- The Fan item will be transported on the 42*42 pallet. In the Item form, go to the Setup tab > Warehouse management field group, and fill in 42″X42″ in the Pallet type field. Save the line (CTRL + S).
- The default pallet quantity is 12. In the Warehouse management field group, find the Pallet quantity field and fill in 12. Save the line.
- There will be three levels of items stored on the pallet, each level containing four pieces.. In the Warehouse management field group, find the Quantity per layer field and fill in 4. Save the line.
- We suppose that the purchase price for the Fan item will be 5$. In the item form, go to the Price/Discount tab > Base purchase price field group and fill in 5 in the Price field. Save the line.
- The default purchase order quantity will be 100. In the Item form, click the Setup > Default order setting menu button. The Default order settings form opens. On the Purchase order tab > Purchase quantity field group fill in 100 in the Standard order quantity field. Save the line.
Set Up a Warehouse
In introduction, we have mentioned about a special place in a warehouse where the item will be placed in order to verify its quality (a quarantine place). Let’s understand how we can set up quarantine places in Microsoft Dynamics AX.
If we go to the
Locations form (
Inventory Management >
Setup >
Inventory breakdown >
Locations) and look through the location types we will not find the quarantine type. We can’t set up a separate location as a quarantine one. Microsoft Dynamics AX allows creating only a quarantine warehouse. So, if the company uses one warehouse for storing and controlling the quality of items, the space in the warehouse must be divided into two logical parts – a warehouse and a quarantine warehouse. A quarantine warehouse can have the same types of locations as the general warehouse has (i.e. bulk locations, picking locations, outbound and inbound docks).
Since the company can have several quarantine warehouses, each quarantine warehouse is assigned to a warehouse.
We assume that the Fan company receives fans to the warehouse 22, and the identification of the quarantine warehouse is 28.
I use the demo data, so the warehouse 22 already exists, let’s check its setup:
- Go to Inventory Management > Setup > Inventory breakdown > Warehouses. The Warehouses form opens.
- Find the warehouse 22 and go to the General tab. Make sure that the Quarantine warehouse field is filled in with the value 28.
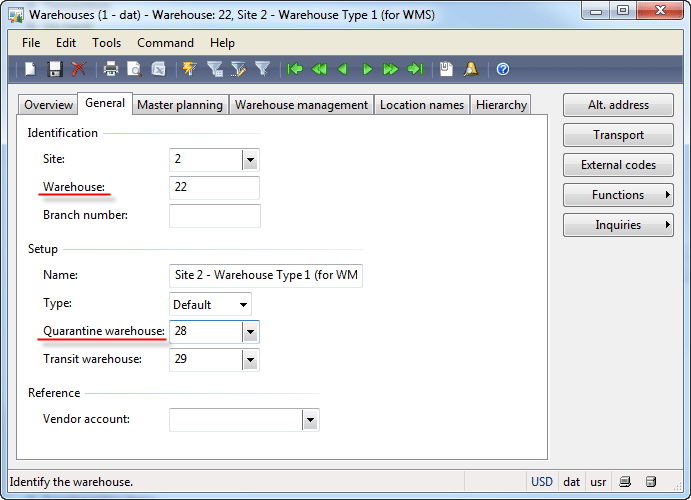
Warehouses form
If an item will be received to a warehouse that doesn’t have the quarantine warehouse set up and the item must be quarantine controlled, the receival process will be stopped and an error message will be shown.
Order Items
We assume that the Purchase Manager orders 100 Fans from the 1001 the Earth Televisions vendor.
Create a purchase order:
- Go to the Accounts Receivable > Common Forms > Purchase Order Details. The Purchase order form opens.
- Create a new line. The Create purchase order form opens. Select the 1001 vendor.
- In the lines area, create a new line with the following values:
- Item number = 101
- Site = 2
- Warehouse = 22
- Save the line. Note that the Quantity field is automatically filled in with 100 and the Unit price field is filled in with the value 5.
We assume that the vendor packs the items and delivers them to the Fan company the same day. Check that the
Delivery date field contains the current date (displayed in the lower part of the
Purchase order form).
Let’s check the inventory transactions:
- Open the Items form and find the 101 item.
- Click the Transactions button. The Transactions on item form opens.
- Add the Location and Pallet dimension in the form: click the Inventory > Dimensions display button. In the Inventory dimensions form, select the Location and Pallet id check boxes and click OK. The Transactions on item form will have the following view:
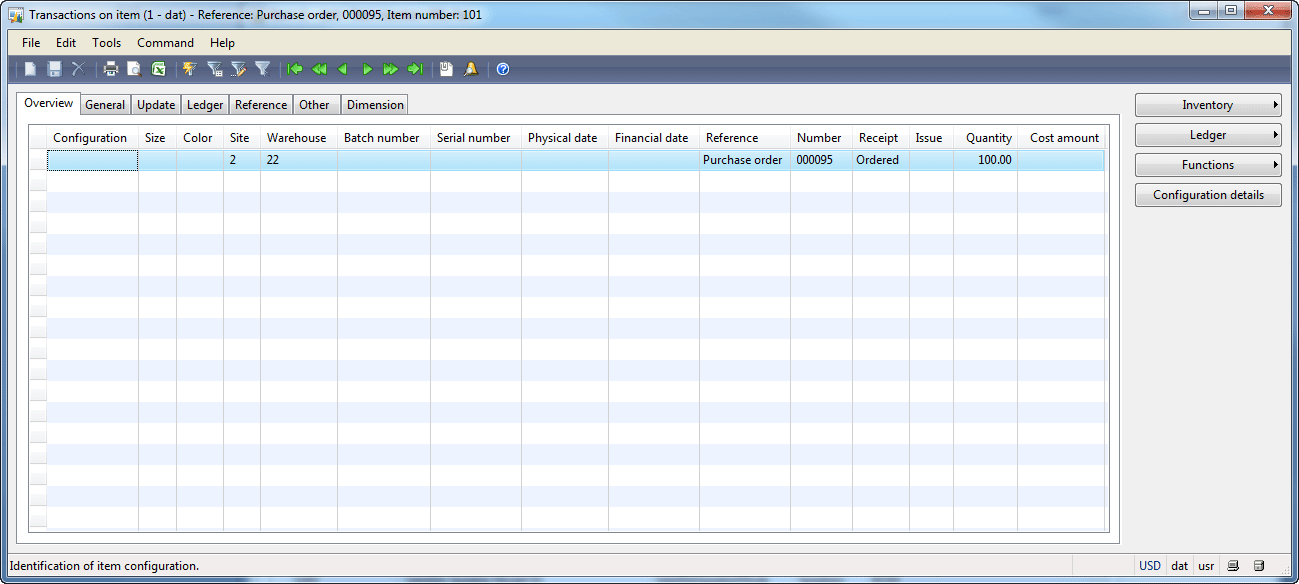 Transactions on item form, Ordered
Item Arrival and Registration
For more information, see the
Item arrival and registration training lesson.
When the truck with the Fan items arrives to the warehouse 22, the Purchase Manager starts the arrival and registration process:
- Go to the Inventory Management > Periodic > Arrival overview. The Arrival overview form opens.
- Find the created purchase order and select the Select for arrival check box.
- Click the Start arrival button.
- The Infolog with the information about the created arrival journal ID will be shown.
- Click the Show button in the Infolog dialog box or go to Inventory Management > Journals > Item arrival > Item arrival. The Location journal form opens. Find the last journal.
- Click the Lines button in the Location journal form. The Journal lines form opens.
 Journal lines form
We can see that one purchase order line with 100 fans is divided into 9 separate arrival journal lines with 12 fans. This is because we store items on pallets and the default pallet quantity for the Fan item is 12 (Item form > Setup tab > Warehouse management field group > Pallet quantity field). Each pallet will be transported to an individual place (location) in the warehouse. The items are received from the truck and placed onto pallets with the help of a Lumper. For more information, see the Purchase business process lesson.
- The Purchase Manager examines received pallets and generates pallet numbers for them. Pallet numbers are required because the Fan item uses the N-WLP inventory dimension group (i.e. when fan items are registered in the warehouse, they must be stored on pallets in a specific location). For each journal line, click the Functions > Pallet id menu button in the Journal lines form.
- Now, the Purchase Manager creates tasks for the forklift driver to transport pallets from an inbound dock to the destination location. A pallet transport task will be created during the posting process if the Pallet transport check box is selected for the journal line. In the Journal lines form go to the General tab > Mode of handling field group and make sure that the Pallet transport check box is selected for each journal line. The destination location will be searched during the posting process. The quarantine location will be searched only if the Quarantine management check box is selected for the journal line. In the Journal lines form, go to the General tab > Mode of handling field group and make sure that the Quarantine management check box is selected for each journal line. Note that the Pallet transport check box is selected by default if the item dimension group has the Pallet ID dimension active. Note that the Quarantine management check box is selected by default on the journal line if item inventory model group has the Quarantine management check box selected.
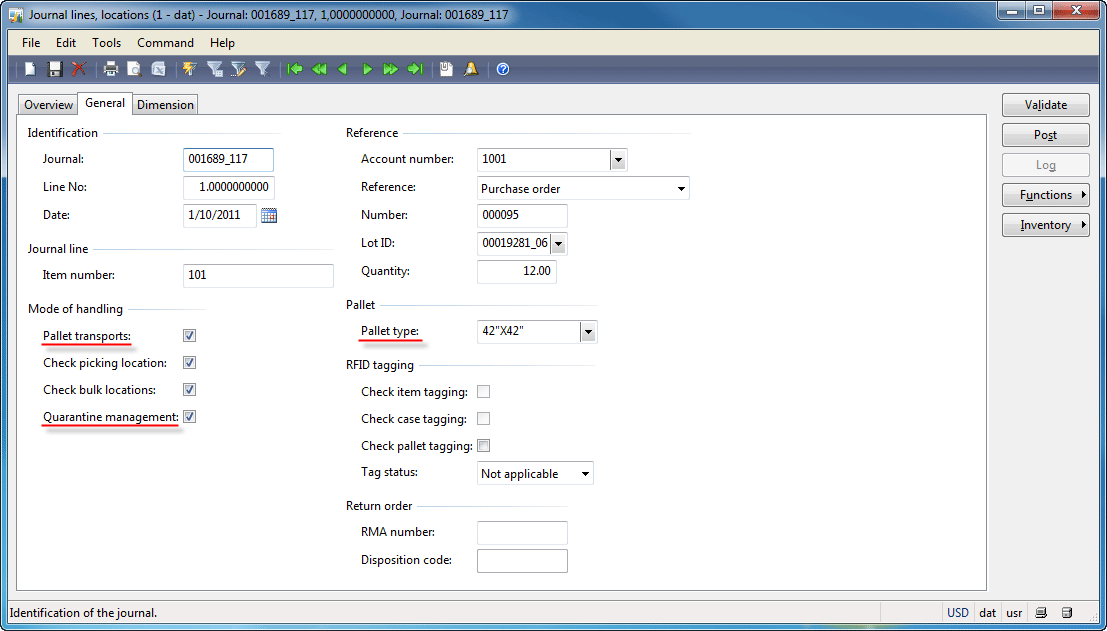 Journal lines form, General tab
The Purchase Manager clicks the Post button in the Journal lines form.
- The “Item 101, dimensions: Warehouse=28, has no picking location in warehouse 28” error message will appear.
How is the destination location for the pallet searched? The Microsoft Dynamics AX has several parameters to control the process of destination location searching.
…
 You are not authorized to see the full training lesson (14 pages are hided).
Download the full PDF version of the Trade and Logistics training for Dynamics AX 2009.
…
Let’s check inventory transactions. Open the
Items form and find the 101 item. Click the
Transactions button. The
Transactions on item form opens. Filter the result for the 00000095_114 pallet. The
Transactions on item form will have the following view:
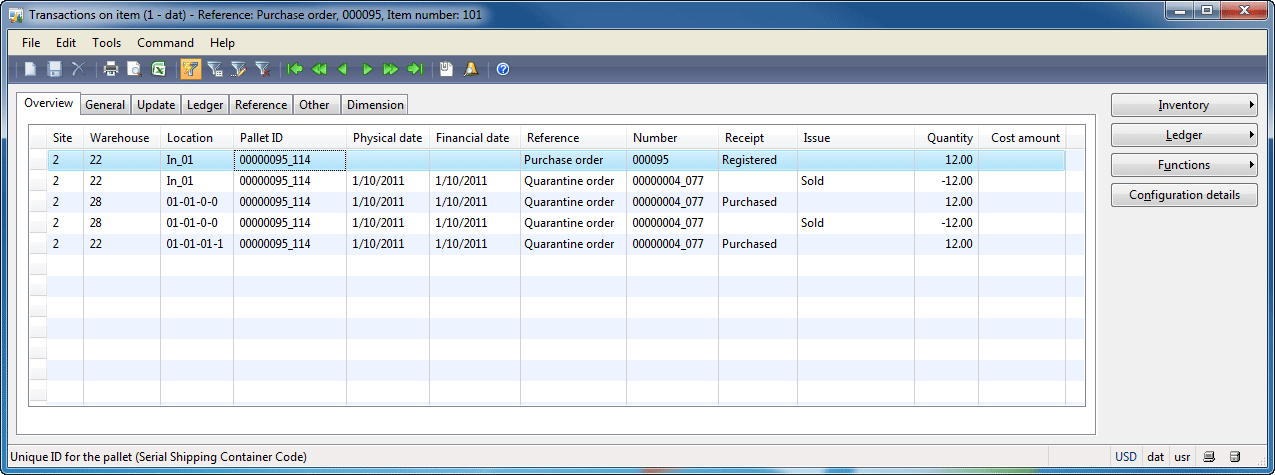
Transactions on item form
We can see that
- The pallet is sold (deducted financially) from the In_01 inbound location.
- The pallet is sold (deducted financially) from the 01-01-0-0 quarantine location.
- The pallet is purchased (received financially) to the 01-01-01-1 destination location.
Also, we can check the on-hand quantity for all mentioned locations:
- Go to Inventory Management > Setup > Inventory breakdown > Locations. The Locations form opens.
- Find the In_01 location (22 warehouse) and click the Inquiries > On-hand menu button. The empty On-hand form is shown.
- Find the 01-01-0-0 location and open the On-hand form. The empty On-hand form is shown.
- Find the 01-01-01-1 location. Open the On-hand form. The following form is shown:
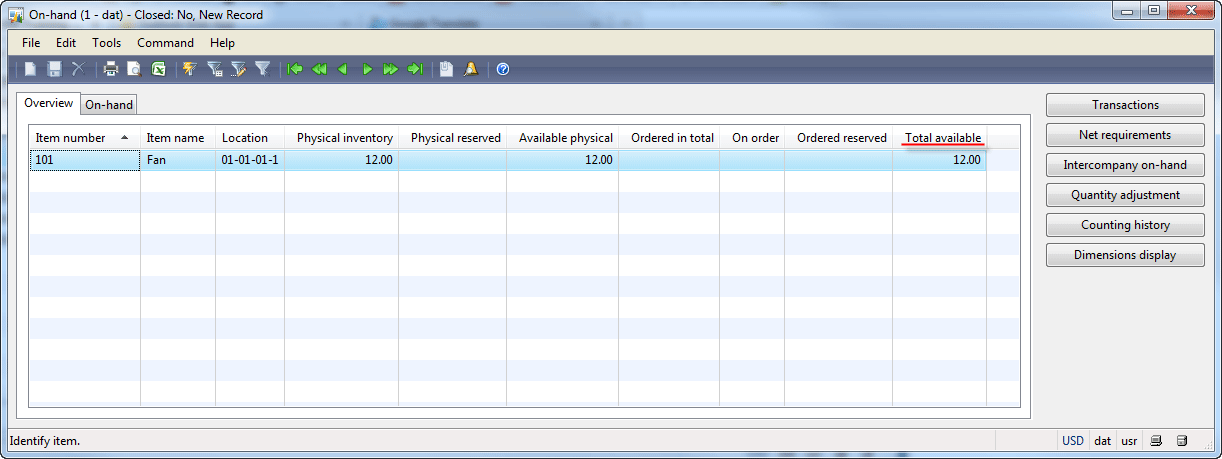 On-hand form
Training Lesson Summary
In this training lesson, we go through all steps of receiving quarantine items. The topic studied uses the warehouse management functionality. Note that the number of steps can be decreased if an item doesn’t use the warehouse management (a pallet, location dimensions are inactive).
We have studied the followings:
- Created a quarantine item.
- Set up a quarantine warehouse.
- Ordered items.
- Received items to the inbound dock.
- Transferred items to the quarantine locations.
- Used Quarantine management.
- Transferred items to the destination locations.
All the best

Technorati Tags:
Quarantine management
Источник:
http://www.dynamicsaxtraining.com/dy...ine-management

 Warehouses form
 You are not authorized to see the full training lesson (14 pages are hided).
 Transactions on item form